Deployments
This new functionality in RKD allows us, either during or after completing and locally testing our developments, to deploy the corresponding module to an Odoo environment. This can include Odoo SH, a VPS, or Dockerized Odoo instances.
To perform this action, our framework now provides a set of new commands to simplify the configuration of deployment targets. These commands allow the developed modules to be tested in a development or staging environment by functional consultants or QA testers.
It is no longer sufficient to test our modules only in a local environment and validate their correct behavior. We can now move this validation process closer to a production-like instance and, at the same time, ensure that the module is permanently deployed within the client’s system.
In this section of the documentation, we will list these new commands and explain how to use them according to each use case.
Before Getting Started:
It is important to note that in our development environment, the directory intended for the modules we develop is
addons/
Therefore, the Odoo developer must always create or clone the module they want to work with inside this directory, since the framework will search for modules in this location by default.
Deployment Commands:
- Help command for deploy
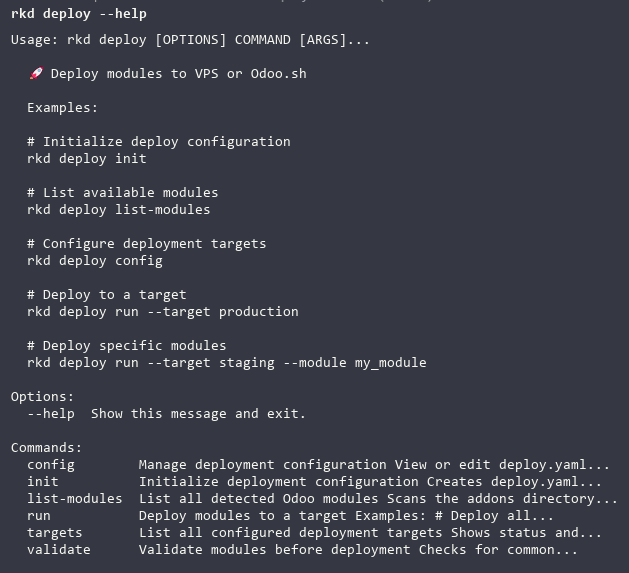
- Command to start the deployment configuration process

- Command to list the modules prepared for deployment
- Command to fully verify the deployment targets defined
- Command to execute the deployment
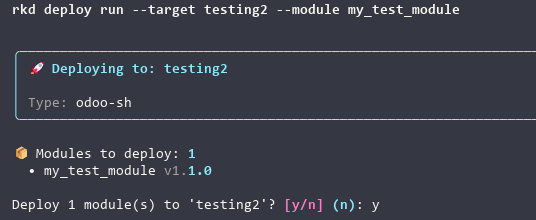
- Allows specifying the configured target for deployment
- This command allows you to explicitly specify which module you want to deploy
- Validates the modules before deployment
Deployment to Odoo SH
To get started, the developer must have developer access to the Odoo SH environment and repository permissions in order to execute a deployment on an Odoo SH instance. For this reason, when creating the development environment, it is also essential to select the option to manage private repositories, as this will list the SSH keys connected to the developer’s GitHub repository.
For this and all deployment scenarios, we will use the following command:
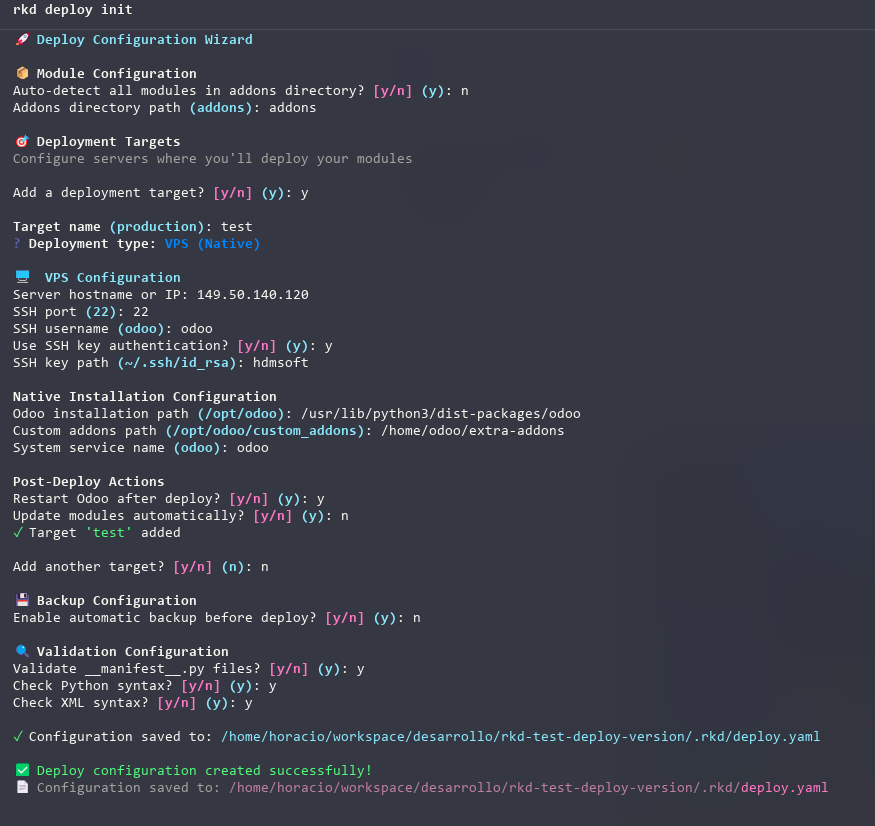
This command initializes the deployment configuration by guiding us step by step through the required parameters to later execute the application deployment.
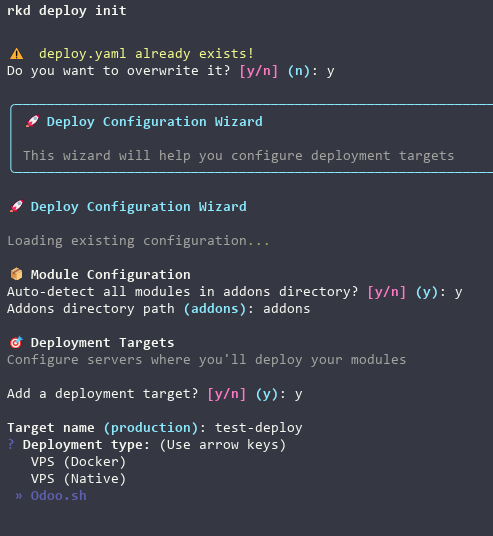
Let’s review the steps one by one:
- First, it informs us that a deployment configuration already exists and asks whether we want to overwrite it.
- Then, it asks whether we want to auto-detect the module(s) to deploy. If there is more than one module in the addons/ directory, it is recommended to select "n" (No) and later specify the module using the --module
option. - Next, it asks for the directory where the module is located. By default, it suggests addons, so we enter addons.
- We indicate that we want to create a deployment target.
- We then select the environment where the deployment will be performed. In this case, we select Odoo SH.

This section is critically important, as the requested parameters correspond to the deployment target itself.
Project
-
In the Odoo SH configuration, the system first asks for the project ID. This can be obtained by checking the project in the dashboard, either from its URL or its name. The URL usually follows this structure:
odoo.sh/project/project-id
where project-id is the project ID. -
Next, it asks for the deployment branch and suggests development or staging by default. It is important to know the name of the branch created under Staging (in this example, it is "test"). If a branch name that does not exist in the project states is provided, Odoo SH will create the branch during deployment under the Development state, as is standard behavior.
-
In the next step, it asks whether we will connect to the environment via API. If the developer has an existing token, this option can be used; otherwise, selecting NO will use the repository permissions instead.
-
The Git remote name is almost always origin, which is why this option is suggested by default (RECOMMENDED).
-
Finally, at this stage, it is necessary to copy and paste or enter the repository URL where the application will be deployed.
-
After creating and naming the target, the system confirms that it has been added and asks whether we want to create another target.
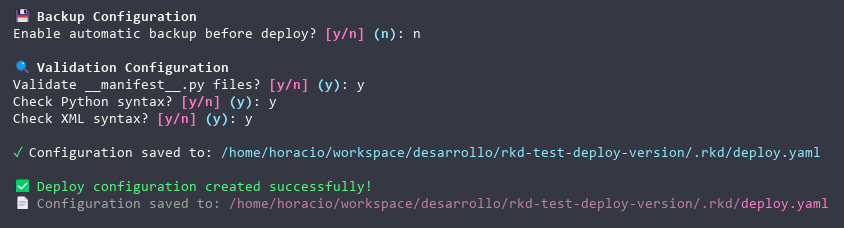
Backup Configuration
- The system offers the option to create backups of our deployments.
Module Validations
- In this section, the system requests validation of the module structure.
- Finally, it indicates that the deployment configuration has been successfully created.
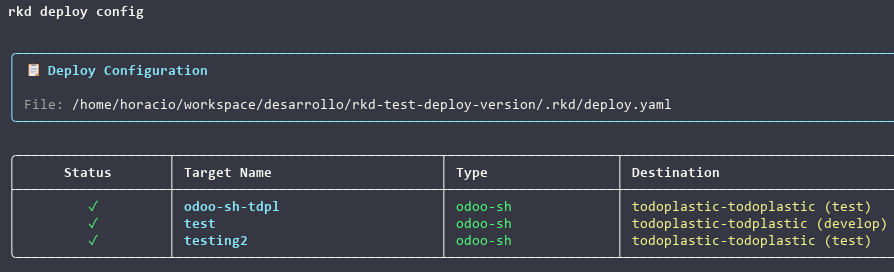
This configuration can also be reviewed using the rkd deploy config command, which lists all the created targets.
Running a Deployment on Odoo SH
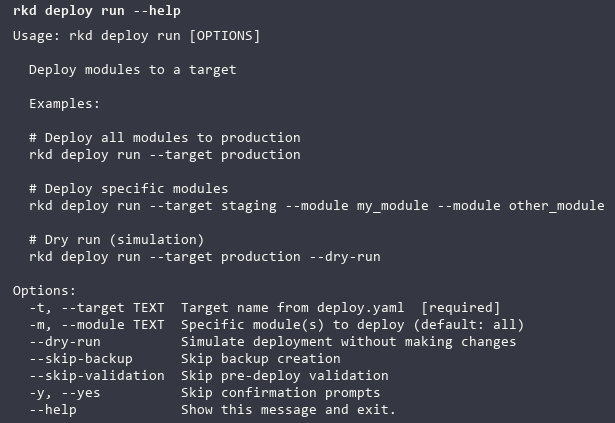
- This command displays the available options and flags to execute the deployment. It is recommended to explicitly define the target and module when managing more than one.
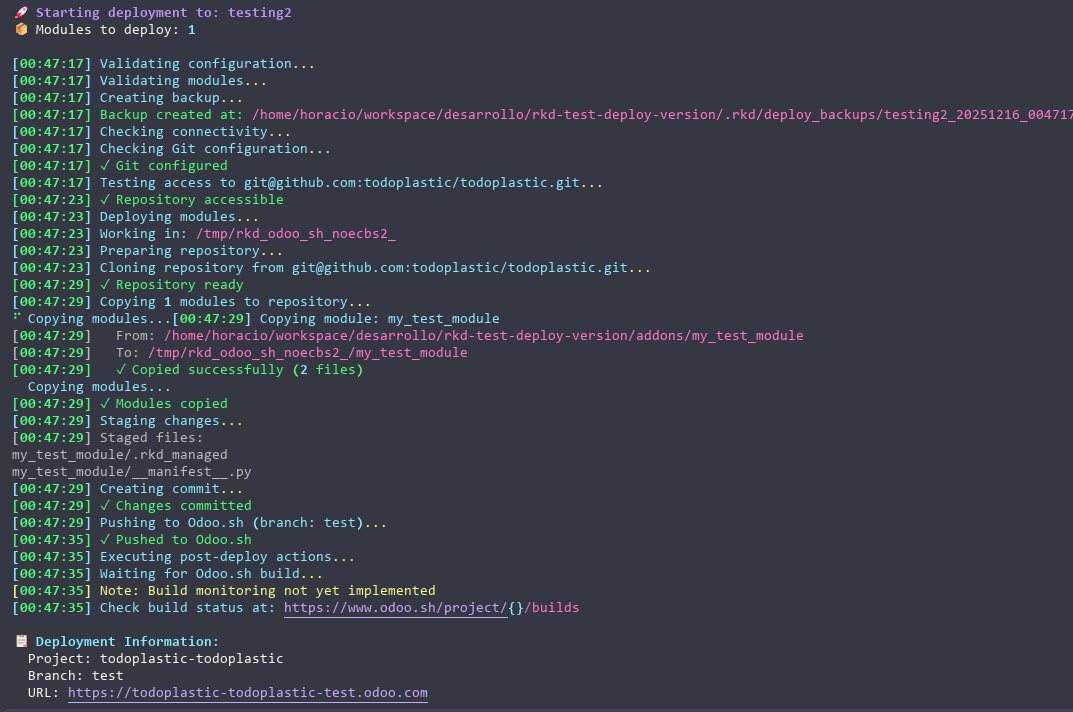
- This view shows the entire deployment process, allowing us to verify the checks performed by Rocketdoo, such as access to the target repository, correct module copying, successful commits and pushes, and finally a message indicating that the deployment was completed successfully.
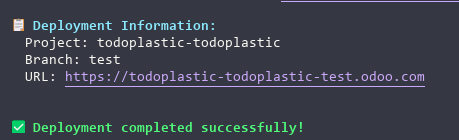
- Finally, we can verify the deployment in the Odoo SH administration panel on the corresponding branch.


Deployment on VPS (Native)
For this deployment, we will follow the initial steps in the same way as for an Odoo SH deployment. The difference is that when selecting the deployment type, we must choose VPS (Native).
It is then important to have sufficient information about the target server, such as:
- The public IP address of the server.
- The SSH connection port enabled on the server.
- The SSH key that will be used to access the server. If you do not use an SSH key, the system will indicate that it will request the password at the time of deployment.
- Define the SSH key by its name, or provide the server password.
- The Odoo installation path on the server.
- The path for development or third-party modules.
- The name of the Odoo service on the server, used for restarts.